Pattern Description:
This is a super cool little cross over pattern from the mega-mind of Andy Burk. With a sparse marabou tail, slender body, jiggling rubber legs and unique wingcase, this fly can cross over from a damselfly nymph to a stonefly to a minnow to a crawdad to a peanut butter and jelly sandwich by merely altering your thoughts on fishing it. I’ve tied up a bunch of these for my “little bit of everything” box and am looking forward to tossing them this season. Of course you can alter the body materials to suit your needs, as I have done here. The original pattern is tied much more sparsely than my version here, and uses antron dubbing for both the abdomen and the thorax. In the case of this skinny version, apply the thorax dubbin in the conventional manner rather than with a dubbing loop. Hell, you can sub in all sorts of materials here: regular rubber legs, sili legs, all sorts of different dubbing, even try using a Thinskin wingcase in place of the turkey tail slip. Go crazy.
Materials Needed:
Hook: TMC 200 #6-16
Bead: Brass or Tungsten, color of your choice and sized to match the hook
Weight: (optional) Lead wire sized to hook
Tag: Pearl Krystal Flash
Tail: Barred Marabou
Rib: Pearl Krystal Flash
Abdomen: Dubbing of your choice, I used gold hare’s mask dubbing for the pattern here, but antron dubbing in olive, black, brown, golden or whatever catches your eye will work too.
Legs: Tan SuperFloss or Flexi-Floss, or sub as above
Thorax: Dubbing again, I used the poll fur (the darker, spikier stuff between the eyes) from a gold hare’s mask here, but antron or damn near any other dubbing would work
Wingcase: Turkey Tail Feather slip, coated with Vinyl Cement and cut with a notch, you can also use Thinskin applied in the same manner
Step 1
Place the bead on the hook and slide it up to the eye. Make about a dozen turns of lead wire around the shank and break the ends off flush. Push the lead wraps up into the back of the bead. Start some tan 8/0 thread, or 8/0 thread in a color to match the dubbing, just behind the lead wrap and build a small thread dam against its back edge. Wrap forward over the lead anchoring it in place to the bead and then wrap back again to the hook bend.
Step 2
Tie in a single strand of pearl flashabou at the hook bend with just a couple tight wraps of thread.
Step 3
Wrap the strand of krystal flash down the bend six or seven turns then return it over the first layer back to its starting point.
Step 4
Tie off the flash at the starting point with a few tight turns of thread.
Step 5
Clip the tag end of the flash and select and cut a few somewhat even fibers of marabou from the clump. Measure these fibers so they are about, and I use the word “about” loosely here, the same length as the hook shank.
Step 6
Tie the tips of the marabou in at the bend with a band of several tight thread wraps. Life the butt ends up and bring the thread up the shank to just behind the bead. Tie the butt ends of the marabou down again at the front of the hook creating an underbody on the shank.
Step 7
Wrap the thread back over the marabou to the bend of the hook and then return it to the midpoint on the shank. Tie in a single strand of the pearl krystal flash along the near side of the shank and wrap back over it to the bend. Return the thread to just behind the lead wraps.
Step 8
Dub a slightly tapered abdomen up about 75-80% of the way up the hook.
Step 9
Spiral wrap the flash forward through the abdomen as a rib and tie it off at the front. Clip the flash.
Step 10
Tie a single strand of SuperFloss in on the near side of the hook with a couple tight wraps of thread. Stretch the back end of the floss a bit and wrap back over it onto the front end of the abdomen leaving a wide gap along the shank.
Step 11
Do the same thing on the far side of the shank.
Step 12
Draw some thread from the bobbin and loop it around the shank creating a dubbing loop. Place your Dyna-King Dubbing Whirl in the bottom of the loop to hold the strands of thread apart
Step 13
Place some spiky gold Hare’s Mask dubbing in the loop so it is centered on the thread. Keep in mind, if you are using antron you can skip the dubbing loop and simply twist the antron dubbing onto the tying thread in the conventional manner.
Step 14
Pinch the thread loop below the dubbing and spin the Whirl in your fingers. Once the thread has been twisted up sufficiently below your pinch point, let go of the thread loop and let that twist run up the thread, capturing the dubbing in a tight fur noodle.
Step 15
Wrap the dubbing loop forward from the front of the back sert of legs to the back of the front set, brushing the loose fibers back after each turn.
Step 16
Make a couple more turns of the dubbing loop in front of the front legs. I like to sweep the legs back and place a wrap over their front Tie off and trim the dubbing loop. Make sure you still have a bit of room between the front of the dubbing loop and the bead.
Step 17
Trim the thorax dubbing flat across the top of the fly.
Step 18
Like this…this will help the wingcase sit tight to the thorax.
Step 19
Cut a notch in the tip of your coated turkey feather as shown here. I fold the feather in half lengthwise and cut from the open side to the fold with one snip. If you folded it exactly in half you’ll have a nice, symmetrical notch.
Step 20
Lay the turkey slip in place with your thread hand on top of the thorax so it extends to just past the back legs and the back edge of the thorax.
Step 21
Press your material hand thumb down on top of the slip to hold it in place, flat across the top of the fly.
Step 22
Capture the front of the turkey slip with a few wraps of thread. I try to get the feather to buckle around the shank and cup downward, encompassing the top of the fly.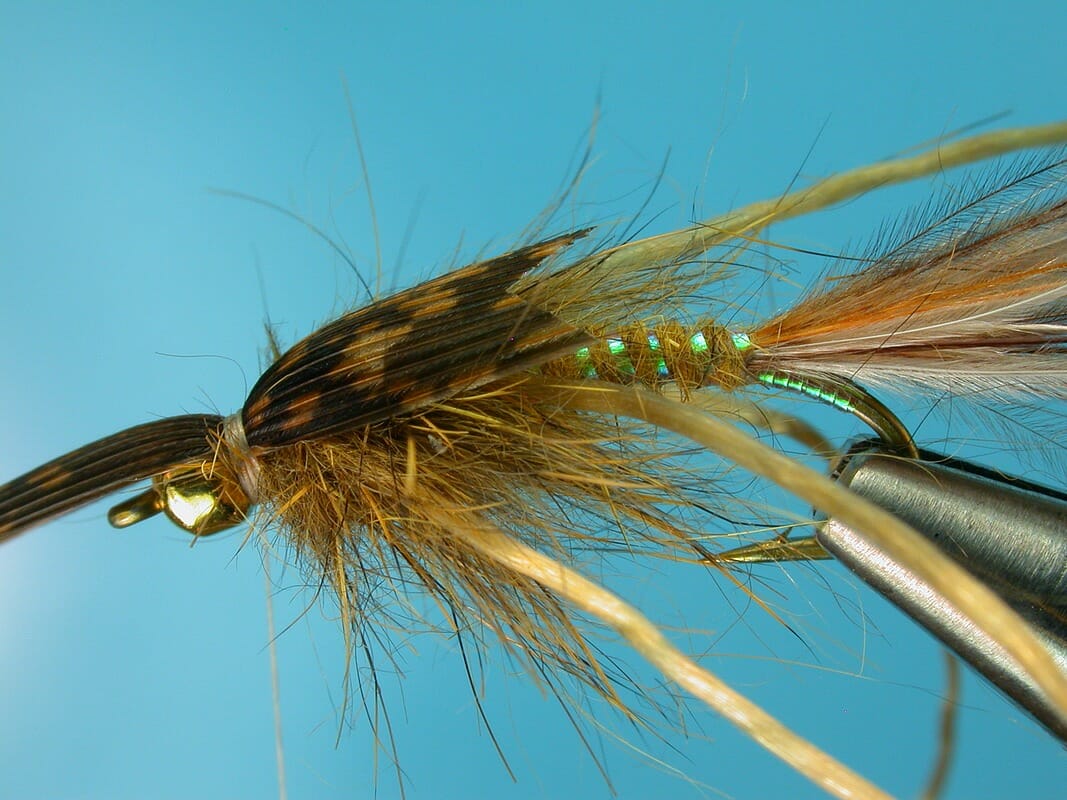
Step 23
Clip the stub end of the turkey slip flush. Make a few more turns of thread over it to cover the butts. Dub a small bit of fur onto the thread and build a short collar behind the bead to hide these thread wraps. Whip finish just off the back edge of the bead and clip the thread.
Step 24
Trim the legs so they are about a shank length long.
Step 25
And dress them up with a bit of Sharpie marker make-up.
Step 26
Finished fly, quarter top view.
Step 27
Top view.
Step 28
Side View.
